GDAP
GDAP ( Granular Delegated Admin Privileges ) Introduction
GDAP capabilities allow customers to control access to their workloads in order to better address their security concerns.
GDAP in Partner Center
GDAP is a security feature that provides customers with least-privileged access following the Zero Trust cybersecurity protocol. It lets customers configure granular and time-bound access to their customers' workloads in production and sandbox environments. This least-privileged access needs to be explicitly granted to customers.
Access can be partitioned per customer. With GDAP, customers no longer have access to all customer tenants across Azure subscriptions through Admin agents by default. Instead, customers managing Azure are part of a separate security group, which is a member of the Admin agent group. This group grants owner role-based access control (RBAC) access on all Azure subscriptions for that customer. Customers managing Azure no longer receive the Global Admin role on their customer’s tenant but rather, receive lower permissions to read a customer directory by default.
Auto Provisioning
Default Setting for GDAP is "Minimal".
Once a Tenant is provisioned, PRISM automatically creates a GDAP relationship using default permissions with a duration set for 2 years.
Managing GDAP in PRISM
Please note that within PRISM the GDAP tooling in managing the relationships between rhipe and the end customer. For more information on setting up this second GDAP relationship, please refer to
this documentation.
To manage GDAP for a customer, navigate to the customer tenant and select Manage
Within the tenant select 'Manage GDAP' to access the GDAP settings within PRISM
On clicking Manage GDAP button a small popup pane is displayed below with a variety of options.
Note: Show all GDAPs toggle will displays all relationships with different GDAP permissions set for the tenant. Toggling this off, would provide you with a list of all active and approval pending GDAP admin relationships.
Within the Manage GDAP popup pane, there is an option to set the duration ( upto 2 years ) for the GDAP permission preset.
The 2 Permission Presets available are ;
1. Minimum
2. Standard
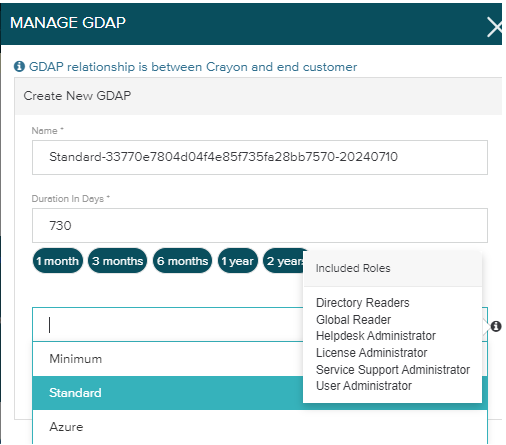
3. Azure
Create New GDAP Relationship
To create a new GDAP relationship, navigate to the Manage GDAP button within the Tenant and on clicking it the manage GDAP popup pane opens up.
Within the popup pane, enter the relationships name followed by the duration in days ( or choose the most commonly used options below). Select the permissions level required and the click submit
Once submitted, the following message is displayed.
Once relationship has been successfuly created in Partnercentre, the following message is displayed.
with the following permission message listed with the status.
Display Name Suggestion
A GDAP display name is suggested when user selets a permission set or when user load the manage GDAP screen first time.
The suggested GDAP name changes when different permission set is selected.
Terminate GDAP
To Terminate a GDAP relationship, you need to have an Active GDAP relationship. Navigate to the Manage GDAP button within the Tenant
On clicking Manage GDAP button a small popup pane is displayed below with a variety of options and a list of all active GDAP relationshion
Select the relationship that you would like to terminate and click on the terminate button.
A confirmation window appears and once confirmed the selected relationship will be terminated.
Email GDAP Invitation Link
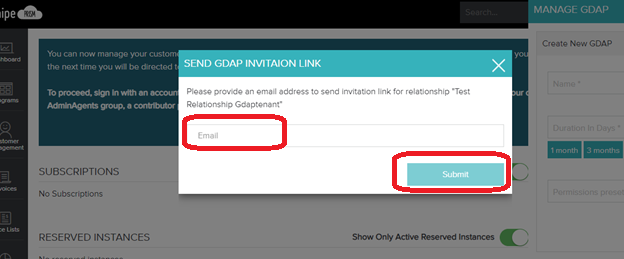
To copy and email GDAP invitation Link, navigate to the GDAPS List within the Manage GDAP popup pane and click on the GDAP relationship for which you would like to send invitation to.
For emailing the GDAP relationship and to gain approval for it, please use the email icon that available, on clicking it the following popup is provided. Enter the email address of the person from whom you require the approval for the GDAP relationship and click on Submit
Once invitation has been submitted the following message would be provided on the successful submission and an email would be sent out.
GDAP Flow

Comments
0 comments
Please sign in to leave a comment.